12 Oct 2022
How to perform ultrasound-guided pericardiocentesis without X-rays
A problem-solving step by step tutorial
My toolkit: A problem-solving step by step tutorial provided by Christian Dworeck & Tobias Schmidt
Frequency of the problem:
Expert level:
Summary
Pericardial effusion (PE) occurs in different clinical settings and might lead to pericardial tamponade. Today, elective or acute pericardiocentesis can, as a therapeutic or diagnostic procedure, be performed safely with echocardiographic guidance.
Since there is a growing number of complex interventional procedures, the risk of facing complications such as acute PE is increasing too. Even in acute settings in the cath lab, with sometimes small amounts of fluid causing serious hemodynamic consequences, echocardiography-guided pericardiocentesis is safe and swift.
In general, there are three percutaneous access options for reaching the pericardial space: the apical, subxiphoidal, and parasternal approaches. The choice of the access depends on the main location of the PE, or the type of PE (circumerential, etc.). A subxiphoidal puncture might be the most suitable access in cardiac arrest and pre-arrest situations (i.e. CPR impeding an apical puncture). Otherwise, an apical puncture is, in our view, often the safest approach reducing relevant pneumothorax risk when performed under ultrasound guidance.
Echocardiography is an essential diagnostic tool for detecting a PE. This article illustrates a technique for a safe and controlled pericardiocentesis thanks to echocardiographic guidance.
The problem
The pericardium is a double-layer, strong fibrous structure covering the heart and containing a physiological fluid volume of a few centiliters. The accumulation of additional fluids in the pericardial space might lead to the compression of the (right) heart. Patients with pericardial tamponade often present with sinus tachycardia, elevated jugular venous pressure, dyspnea, and progressing hypotension. Thus, pericardial tamponade is mainly a clinical diagnosis. This life-threatening situation requires immediate diagnosis, and pericardiocentesis must be performed without further delay. Therefore, the ability to perform a safe and effective acute pericardiocentesis is a mandatory skill for every interventional cardiologist.
Principal idea
Ultrasound-guided pericardiocentesis enables operators to visually follow the needle on the ultrasound screen, reliably avoiding vital anatomical structures and confirming the needle tip’s position in the pericardial space by ultrasound contrast before advancing a wire. (video 1)
Ultrasound biopsy software (biopsy lines on the screen indicate the predicted course of the needle, see dotted lines in video 1) and a matching needle guide (an adapter attached to the ultrasound probe holds and guides the needle, picture 1 and video 2) might not yet be available in all cath labs. However, they add safety and ease of performance to a lifesaving procedure often performed in highly acute circumstances.
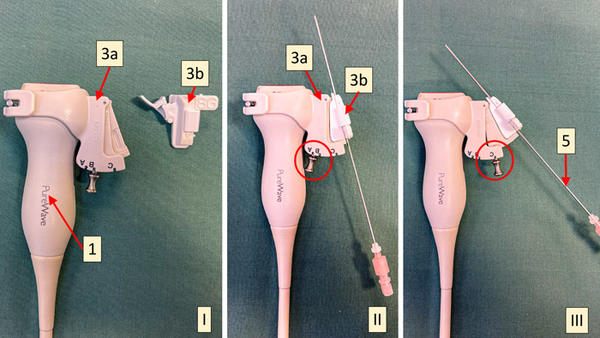
Picture 1 - Ultrasound probe (1) with non-sterile part of the needle guide (3a) attached, sterile part of the needle guide (3b) at the side (I), sterile part attached to the non-sterile part (sterile cover between sterile and non-sterile part not shown), in angle A (II), same as (II), but angle C (III). 5: 18G puncture needle

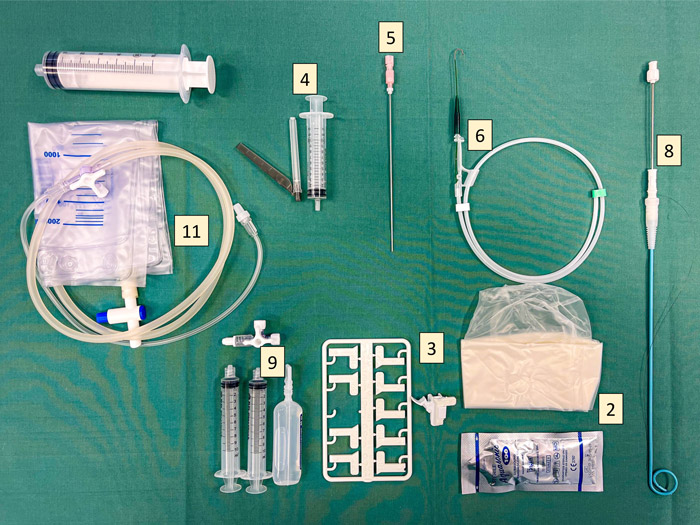
Material needed
The whole equipment should primarily be stored in the cath lab in an easily accessible and mobile box.
- Ultrasound (heart probe) with biopsy software
- Sterile cover of the ultrasound probe + sterile ultrasound gel
- Needle guide: Non-sterile part (3a), sterile part (3b) (See picture 1 above)
- Local anesthesia, 10ml syringe, 20–25G cannula
- 18G puncture needle (length at least 11cm, optimal 15cm), ultrasound-adjusted
- 0.035/0.036-inch J-guidewire (length approx. 70cm). Note: Always check first that your guidewire fits through your needle beforehand. Needles from different companies might have different inner diameters.
- Scalpel
- Pigtail catheter 6 or 8 French, with dilatator or metal inlay
- 2 10ml syringes + 3-way stopcock for microbubbling NaCl
- Sterile covers
- 50ml syringe and fluid collection bag for drainage
The team setup in this approach is important; the physician and assistant are dressed in sterile clothes. A second sterile-dressed physician is not mandatory but might simplify handling the simultaneous ultrasound and puncture. After choosing the puncture site, this region is prepared in a sterile manner. The procedure is simplified with a sufficient sterile workspace by covering the whole patient, chin to feet, with a sterile sheet.
A needle guide is not mandatory and not yet available in all cath labs, and the technique can be performed without it. Nevertheless, adding more safety and ease to your procedure we highly recommend supplying your ultrasound machine with the necessary software and purchasing a needle guide. In certain situations, detecting a small amount of fluid in the three-dimensional thorax by freehand can be quite challenging; a needle guide simplifies this and enables the operator to perform both ultrasound and puncture simultaneously.
You might add even more safety by performing non-acute pericardiocentesis in the micropuncture technique, using a 20 or 21G needle, advancing a 0.018-inch microwire, and then exchanging it for the 0.036-inch wire via a microcatheter.
Method step-by-step
Step 1
- Start a virtual biopsy line on the ultrasound screen.
- Check the apical/thoracal (video 3) and subxyphoidal/abdominal (video 4) views
- Choose the location with
- the biopsy line, avoiding any vital structures (heart, liver, lung).
- A subxyphoidal puncture often passes through the liver.
- In an apical puncture, keep away from LIMA.
- Choose the best angle for the biopsy line (video 2)
- the longest possible axis within the pericardial effusion.
- From a subxiphoidal view, the puncture is always directed toward the right heart (short part of the puncture axis within the effusion).
- From an apical view, the puncture canal is roughly parallel to the cardiac long axis (long part of the puncture axis within the effusion, reducing the risk of cardiac puncture). Thus, the safest location will often be apical (mainly 2–3 cm caudal of the left mamilla).
- the biopsy line, avoiding any vital structures (heart, liver, lung).
Step 2
Sterile preparation of the chosen body region.
Step 3
Sterile ultrasound probe cover and needle guide
- Attach the non-sterile part of the needle guide to the ultrasound probe (if available). Make sure to have the same angle as you choose on the screen. (see picture 1, video 2)
- Put a sterile cover on the ultrasound probe
- Install the sterile part of the needle guide (choose the one matching your needle gauge) to the (sterile-covered) non-sterile part of the needle guide (if available).
Step 4
Apply local anesthesia with or without ultrasound guidance.
Step 5
Prepare the “ultrasound contrast” by flushing standard NaCl. Take 10 ml in one syringe and e.g. 3 ml of air in the other syringe. Connect both with the three-way stopcock, and quickly flush the fluid from one syringe to the other over the three-way stopcock until microbubbles give a milky appearance. Note that the microbubble effect only lasts a short time, so you need to shake it again directly before use. Let the assistant practice before a procedure. (video 5)
Step 6
- Advance the 18G needle (with or without a stylet) through the needle guide under a continuous ultrasound (video 6). Place the ultrasound machine on the other side of the patient so that you can view both the puncture site and the screen simultaneously.
The needle guide locks the cannula to the ultrasound probe. Hence, you can hold the probe in your left hand and advance the needle with your right hand (in the beginning, this might be easier with two colleagues). A syringe on the cannula is not mandatory since pericardial fluid most often flows back when you enter the pericardial space. - As soon as you have a clear ultrasound view of the needle entering the pericardial space and serous fluid appears through the cannula, you can be confident about the needle’s position and advance the j-wire.
- If you do not have an optimal view of the needle tip’s position, and especially if blood is aspirated, you should confirm the needle’s position by injecting bubbled ultrasound contrast through the needle (keep holding the probe with your left hand and the needle with your right hand. The sterile-covered assistant then attaches the contrast syringe and in a firm push injects 5–10ml contrast). The contrast creates a snowflake-like image; in nearly all cases, this will clearly show the needle’s position (if the ultrasound view is still good). (video 1) If no fluid flows back from the needle passively, aspirate before injecting the contrast.
Step 7
Advance the 0.035-inch J-wire. No resistance should be felt. Advance a good part of the wire into the pericardium to create support for advancing the pigtail catheter (advance so much of the wire that the wire part outside the body is 2–3 cm longer than the pigtail). If you have doubts about the position of the wire, perform a fluoroscopy if available. This is not a mandatory step; the technique can be safely performed outside a cath lab. In addition, check the ECG while advancing the wire. If ventricular extrasystoles occur, check the wire’s position again.
Step 8
Make an incision with a scalpel.
Step 9
Advance a 6 or 8 French pigtail catheter over the J-wire (video 7). Be sure to advance at the same angle as the puncture was performed. Since the pigtail is a flexible catheter, you will need one of the following methods (sometimes both) to get it in:
- A plastic dilatator is used over the wire before inserting the pigtail.
- The pigtail comes with an inside metal cannula for better axial strength. In this case, the pigtail is inserted into the pericardium with the metal cannula inside; shortly after entering the pericardium, the metal cannula is detached from the pigtail. Only the pigtail is advanced further.
Step 10
Aspirate pericardial fluid, and recheck the blood pressure. Check, by ultrasound, that the effusion is decreasing (as confirmation of the correct location of the catheter).
Step 11
Flush the pigtail with Nacl (with or without heparin) to prevent clotting. Do not leave the drainage open over longer periods (risk of clotting).
Points of specific attention
Detailed knowledge of the material, the ultrasound machine, and the puncture technique is mandatory for a safe procedure. Practice regularly.
Do not bend the needle while advancing it. Apply gentle force only in a straightforward direction.
It is essential to feel confident about the correct needle position after the puncture. Using ultrasound contrast adds safety. If you are still insecure about your needle position: If in doubt, take it out (and restart).
For serous fluid, a 6-f catheter is often sufficient. For a hemopericardium, use at least 8F (otherwise, there is a higher risk of clotting).
A word from the reviewer - Alexander Völz
Ultrasound-guided pericardiocentesis is an indispensable skill for every interventional cardiologist, but can be quite challenging depending on the anatomical features of the patient and the location of the pericardial effusion. By applying needle-guidance (and microbubble contrast) the procedure becomes safer and easier. Therefore every cath lab should be aiming at providing the necessary equipment and at implementing this technique.

Authors


1 comment
Although in theory echocardiographic guidance should be safer the only death I had was many years ago when after reading the Mayo Clinic Proceedings report on 1001 cases attempted an apical puncture. In my experience subxiphoid approach under fluoroscopy works very well. As I advance the 0.035 wire I can see if it appears to loop around the pericardial sac or inadvertently follows the RV outflow and the pulmonary artery. Advancing the draining catheter is much easier if one uses an extra stiff Amplatz type wire.