


Self-made steerable catheter to cross the aortic valve in severe aortic stenosis
A problem-solving step-by-step tutorial
When standard catheters and wires repeatedly fail to cross a severely stenotic aortic valve, a simple modification of readily available equipment may provide a solution.
This step-by-step tutorial explains how to create and use a self-made steerable catheter system to facilitate valve crossing in complex TAVI anatomies.
Frequency of the problem:
Expert level:
Summary
This article describes a self-made steerable catheter system using a 6F EBU guide and the stiff back end of a 0.035″ wire, combined with a hydrophilic straight-end crossing wire, to facilitate crossing of severely stenotic or calcified native or prosthetic aortic valves during TAVI.
The technique is particularly useful in horizontal aortas, bicuspid valves, and massively calcified tricuspid or bioprosthetic valves, where the conventional technique repeatedly fails.
By adjusting the position of the stiff wire within the guide and applying controlled torque, the operator can modulate the curve, optimise coaxiality, and steer towards eccentric or slit-like orifices, enabling gentle wire passage into the left ventricle and subsequent exchange for a dedicated TAVI wire.
The problem
Crossing the stenotic aortic valve in certain situations, e.g., heavy calcified aortic valve stenoses, bicuspid aortic valves, and horizontal aorta, can be challenging and time-consuming. This describes an approach to facilitate retrograde aortic crossing when standard Amplatz left (AL) catheters and straight wires repeatedly prolapse into the sinus of Valsalva or the ascending aorta.
Multiple techniques have been described to overcome difficulty of valve crossing, including use of multiple catheters1, changing the fluoroscopic view2, retrograde crossing via transseptal route3. When conventional diagnostic or guiding catheters fail, converting the system into a steerable construct by combining an EBU (extrabackup) guide catheter with the stiff back end of a 0.035″.
When to consider this technique
- Severe, heavily calcific native aortic stenosis with a tiny, eccentric, or slit-like orifice in which standard pigtail, AL, or Amplatz catheters and J-tip wires repeatedly fail to cross.
- Horizontal or markedly dilated aorta with loss of coaxiality and repeated prolapse of the catheter out of the left ventricular outflow tract (LVOT) plane.
- Bicuspid aortic valves with raphe-directed, eccentric flow channels that are difficult to engage with standard catheters.
- Markedly dilated aortic root or annulus, where a soft J-wire cannot be directed precisely towards the functional orifice.
- After multiple unsuccessful valve crossing strategies (e.g. pigtail/J-wire, AL1 with straight wire, various diagnostic catheters).
- Heavily calcified bioprosthetic valves or prosthetic valve restenosis with restricted leaflet motion and eccentric orifice.
Principal idea
A 6F EBU-shaped guiding catheter with a short curve (e.g. 3.0) is used to minimise the risk of traumatic aortic injury while providing strong backup support. A standard 0.035″ Teflon-coated wire is introduced from the hemostatic valve with the stiff back end inside the shaft of the EBU to modulate and stabilise the curve.
In parallel, a 0.035″ straighttip hydrophilic polymeric wire (e.g. Terumo) is introduced via a 16G puncture needle connected to the same Y-piece. By advancing or retracting the stiff back end within the guide, the effective curve of the EBU can be shortened or lengthened, allowing the operator to obtain a more coaxial trajectory from the ascending aorta towards the aortic valve plane.
Required materials
- 0.035″ Teflon-coated stiff wire (with clearly identifiable soft and stiff ends)
- 0.035″ hydrophilic straight-tip polymeric wire (e.g. Terumo)
- 6F EBU guiding catheter (short curve, e.g. 3.0; length typically 100 cm)
- Hemostatic Y-piece
- 18 G puncture needle
Step-by-Step technique
Step 1 – Standard setup
Perform a standard transfemoral TAVI setup: establish large-bore arterial access, temporary pacing, and secondary radial or femoral access for aortography according to local practice.
Step 2 – Catheter selection
Prepare a 6F EBU guiding catheter (preferably small curve 3.0; 100 cm length).
Step 3 – Guiding catheter introduction
Insert the EBU guiding catheter in a standard fashion and advance it into the ascending aorta.
Step 4 – Wire preparation
Prepare a stiff 0.035″ wire with distinguishable soft and hard ends.
Introduce the wire with the hard end through the Y-piece until it reaches the curve of the guiding catheter, carefully avoiding the wire exiting from the catheter.
Step 5 – Needle and wire handling
Insert the needle parallel to the wire through the hemostatic valve of the Y-piece.
Advance a 0.035″ hydrophilic, straight hard tip wire through the needle.
Step 6 – Fluoroscopic orientation
Use multi-projection fluoroscopy (typically COV or LAO) to visualise the aortic valve plane and orifice orientation.
Step 7 – Catheter positioning
Gently advance the EBU catheter to the level of the valve, aiming for a coaxial trajectory with the expected orifice.
Adjust the curve by repositioning the Teflon wire, this will allow the EBU guide to take different curves and allow more steerability to "scan" the valve; perform rotational maneuvers in the standard fashion as required.
Step 8 – Key pitfall and safe handling
When introducing the stiff wire through the hemostatic valve, insert it with the hard end first into the proximal segment of the EBU.
Keep the tip within the catheter at all times — never extend it beyond the distal end.
Using fine microtorque maneuvers (a few degrees at a time), systematically scan the valve plane circumference under fluoroscopy, observing tip orientation, calcified commissures, and the suspected orifice.
Step 9 – LV access and wire exchange
Once the guiding catheter is aligned with the valve orifice, gently advance the soft crossing wire into the left ventricle.
After successful crossing, advance the guiding catheter over the wire and exchange the soft wire for an extended length or dedicated TAVI wire.
Points of specific attention
- The stiff back end of the 0.035″ wire must never be advanced beyond the distal tip of the EBU catheter to avoid aortic root dissection, leaflet perforation, or annular injury.
- Avoid excessive torque or rapid movements of the EBU to avoid accidental engagement of the coronary ostia.
- Repeatly aspirate and/or flush the guiding catheter to avoid the formation of thrombi.
- Maintain ACT >300 sec.
- Maintain meticulous hemostasis at the Y-piece and around the needle entry to minimise air embolism or blood loss.
- This technique should be reserved for operators experienced in complex TAVI and high-risk catheter manipulation.
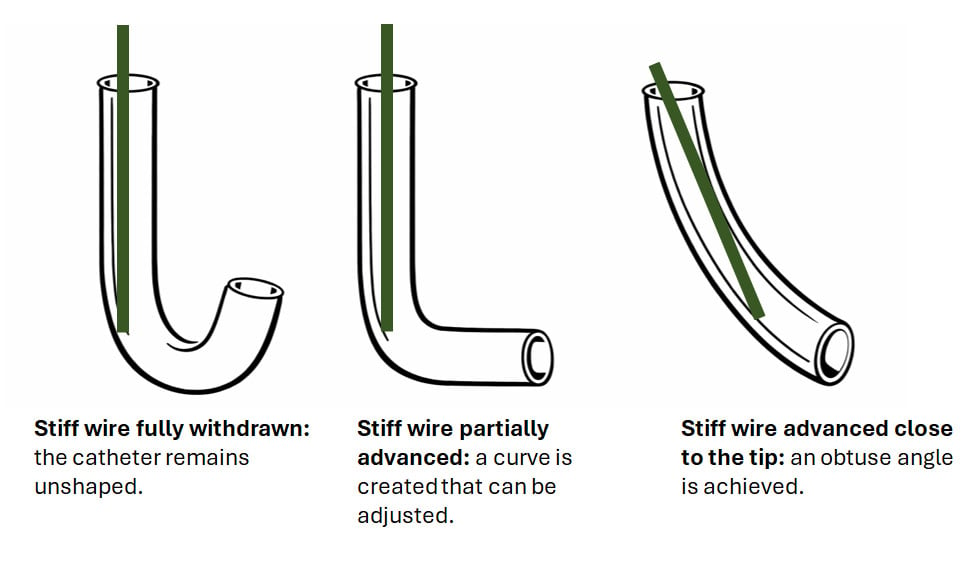
Figure 1: Effect of stiff wire position on catheter configuration
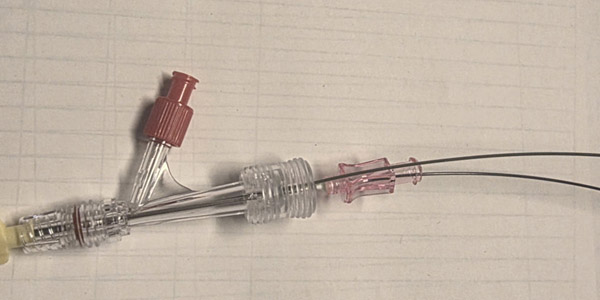
Figure 2: The setup is a Y-Piece with the 2 wires in place (polymeric straight wire inside the needle, the 0.035 wire with the hard end outside)
References
- Kasel AM. Anatomic guided crossing of a stenotic aortic valve under fluoroscopy: "Right cusp rule, part III". JACC: Cardiovascular Interventions. 2015;8(1):119–20.
- Schoels W, Mahmoud MS, Kullmer M, Dia M. A safe and simple technique for crossing stenotic aortic valves. Clin Res Cardiol. 2021;110(3):377-81.
- Bawamia B, Muir D, Vijayan S, Williams P. Anterograde Crossing of a Bicuspid Aortic Valve Through Transseptal Access to Facilitate Transcatheter Aortic Valve Implantation. Heart Views. 2021;22(4):297-9.
A word from the reviewer

Crossing the aortic valve during TAVI procedures may be challenging in certain scenarios, e.g. heavily calcified or bicuspid aortic valves, horizontal anatomies or diseased bioprostheses. Steerable catheters are a valid, yet costly, option to facilitate crossing in these cases.
The authors describe a simple and straightforward alternative, utilising a self-made steerable catheter made from broadly available wires and catheters. Their setup facilitates to selectively position and steer the catheter above the valve orifice in order to cross it with a standard straight polymeric wire. This easy hack adds an additional valuable tool to our TAVI toolbox to optimise procedural safety and efficiency.
Disclosures
The authors declare no conflicts of interest to disclose.
Authors



No comments yet!