TAVI via axillary access: a simple, effective approach
A problem-solving step-by-step tutorial
When transfemoral access is not an option, the axillary route offers a fully percutaneous alternative for TAVI.
This step-by-step approach shows how to secure access and achieve reliable haemostasis using a combined suture- and plug-based strategy.
Frequency of the problem:
Expert level:
Summary - When transfemoral access is not feasible
Substantial advances in transcatheter valve design, delivery systems, and procedural workflows have improved the safety and efficiency of TAVI, supporting its expansion to patients across a broader risk spectrum.
Although transfemoral access remains the default route, it is not always feasible, and alternative access is required in patients with hostile iliofemoral anatomy.
The extrathoracic axillary approach offers a fully percutaneous, operator-controlled pathway. Haemostasis, however, can be more challenging. Unlike subclavian access, the axillary artery is compressible against the second rib when necessary.
Anyway, with a combined suture-/plug-based vascular closure strategy using two ProStyle and one Angio-Seal if needed, you can:
- Improve haemostatic control at the axillary arteriotomy in a compressible, extrathoracic segment;
- Shorten time to haemostasis by combining immediate suture-based approximation with plug-assisted sealing;
- Reduce the risk of early and subacute access-site bleeding.
The problem - No transfemoral access: turning to the axillary route
When transfemoral access is not feasible, a fully percutaneous transaxillary route provides a direct, familiar pathway for TAVI.
However, the axillary artery has unique characteristics: manual compression is more difficult than the femoral artery, bleeding can rapidly track through loose tissue planes, and the puncture corridor lies adjacent to the brachial plexus.
During the removal and closure of a large-caliber sheath, complication may arise. Suture and plug bailout closure may be incomplete or fails resulting in persistent bleeding.
The presence of a backup guidewire-enabling balloon endoclamping-the use of a covered stent or possibly surgery can help resolve the issue.
However, if a rescue wire or secondary access is lost, control options become limited.
For this reason, axillary access must be carefully protected.
Principal idea - Using a standard closure
Axillary access is an attractive alternative for TAVI because the infraclavicular axillary segment is extrathoracic, reproducible and amenable to endovascular bailout, but haemostasis must be engineered.
We use a standard closure, hybrid if needed:
- Deploy two ProStyle before large-bore sheath insertion;
- After valve delivery, tighten the suture while withdrawing the sheath, keeping a 0.035″ safety wire in place;
- Deploy one 8F Angio-Seal over the wire if needed (minor bleeding);
- Maintain a backup, secondary safety channel for angiography, balloon control or covered stenting.
(Notably, LIMA–LAD graft is not an absolute contraindication to use this access with careful CT planning).
Material needed for TAVI via axillary access
- 7F sheath in the femoral or ipsilateral radial artery (a 45-cm-long sheath is preferred for femoral access);
- Wire introduced from ipsilateral radial or femoral access as a fluoroscopic landmark for puncture (alternatively, an ultrasound-guided puncture can be performed);
- Micropuncture set + standard arterial sheaths/dilators for stepwise upsizing;
- 0.035″ guidewire;
- Valve-platform-specific large-bore sheath / delivery system;
- Two ProStyle devices;
- One Backup 8 Fr Angio-Seal;
- Mosquito forceps / suture management tools;
- Occlusion balloon sized ~1:1 to vessel diameter for proximal flow arrest during closure;
- Covered stent(s) and peripheral balloons sized for axillary/subclavian bailout.
Step-by-step method for TAVI via axillary access
Step 1: plan the axillary route (and explicitly manage “axillary-specific” issues)
- On CT, target the axillary segment (between the first rib and the superior border of pectoralis minor) as it is relatively fixed and has fewer branches
- Prefer left axillary in most cases for a more favorable orientation to the aortic valve; reserve the right axillary artery for cases where the left is unsuitable (Figures 1- 5).
- LIMA–LAD graft is not an absolute contraindication. If present, plan to document non-occlusive sheath position and graft patency with small contrast injections after sheath placement.
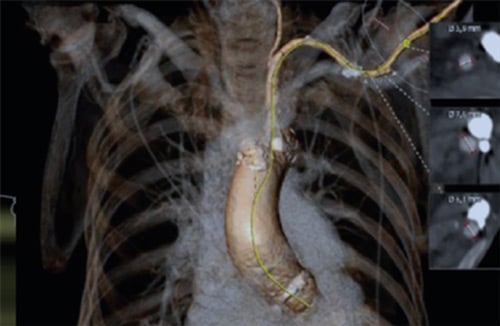
Figure 1: CT scan reconstruction with center line
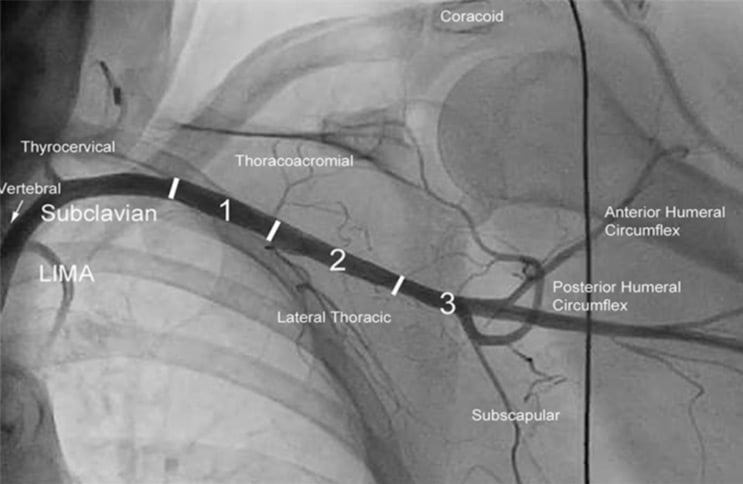
Figure 2: Axillary artery segmentation
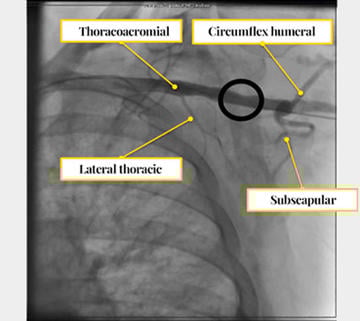
Figure 3: Reference collateral arteries
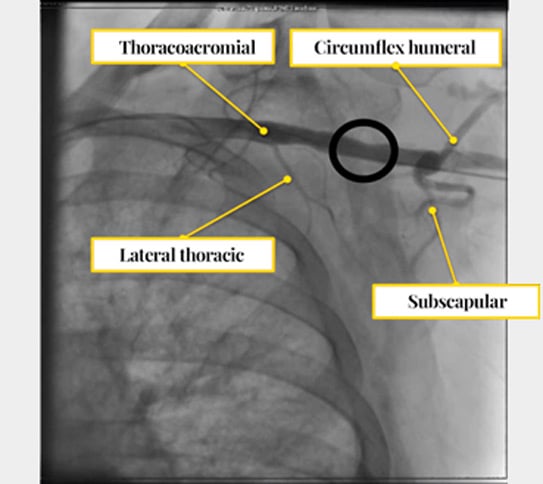
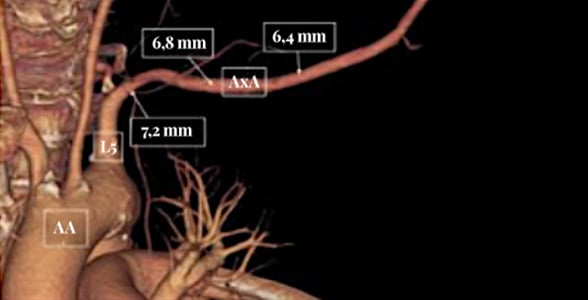
Figure 4: CT scan reconstruction with dimensions (essential to evaluate for access use)
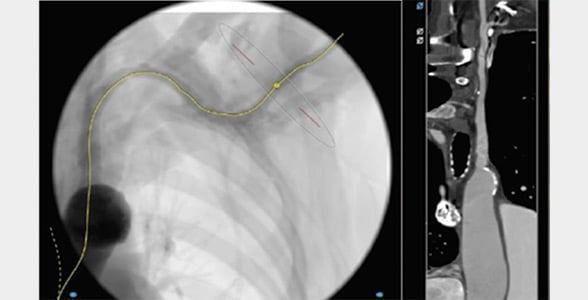
Figure 5: Center line and straight view
Step 2: set up a “backup safety channel” before accessing the axillary artery
- Insert a 6–7Fr sheath in the ipsilateral radial artery or femoral artery (we prefer a 45-cm-long 7 Fr sheath via the femoral artery) for control angiography and bailout interventions (balloon control or covered stent if required) (Figure 6).
- The backup wire is usually rolled up and covered with a tarp to prevent it from getting damaged.
- Define a rescue wire strategy from the outset; don’t commit to irreversible closure steps without a bailout plan.

Figure 6: 7Fr sheath in the femoral artery (for control angiography and bailout interventions); 6Fr-sheath for PMK

Step 3: positioning and imaging (different from femoral: minimise thoracic and nerve risks)
- Position the arm to adequately expose the infra-clavicular region; ensure the puncture remains extra-thoracic and controlled.
- Use fluoroscopy landmarks to remain safely along the rib-cage side and avoid pleural entry.
- Perform angiography with backup wire inside the vessel to evaluate its arrangement and decide the puncture axis (essential for traversing the vessel with the introducer and delivery)
Step 4: ultrasound-guided puncture of the “sweet spot” (if used)
- Under ultrasound guidance, puncture the proximal axillary segment with a micropuncture needle using the standard Seldinger technique.
- Confirm true-lumen wire passage, then insert a small working sheath (Figure 7)
- If anything feels “not right” (wire resistance, unusual course), stop and confirm position with angiography via the safety channel.
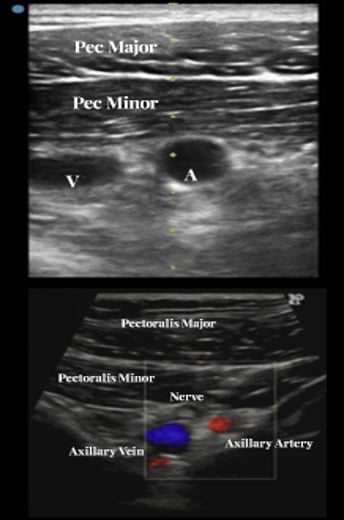
Figure 7: Ultrasound identification of axillary artery, vein and nerve plexus
Step 5: deploy the pre-closure suture devices (ProStyle)
- Over the wire, deploy two ProStyle as a pre-closure device and leave the sutures untied (Figure 8).
- Secure suture ends to avoid tangling during exchanges.
- Exchange to the large-bore sheath over a stable wire.
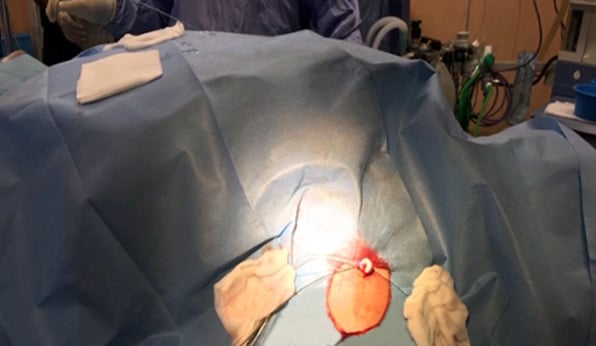
Figure 8: Axillary access with Prostyle positioned and 10Fr in place
Step 6: perform TAVI “as transfemoral” once access is secured
- Proceed with valve delivery and implantation using your planned platform (Figure 9).
- Maintain coaxial alignment of the delivery and avoid traction/torsion on the axillary arteriotomy during device exchanges.
- Keep the safety channel available throughout.
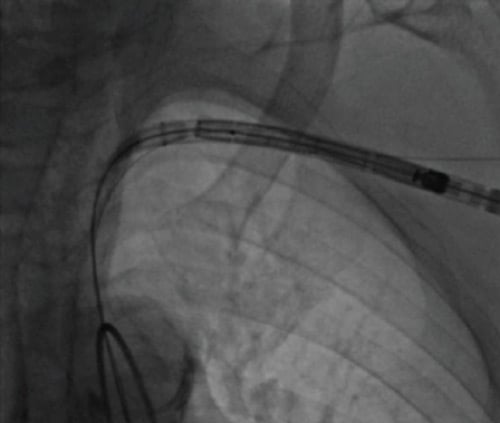
Figure 9: Passage of the valve delivery from the axillary artery, through the subclavian artery into the aorta
Step 7: prepare for axillary haemostasis (do NOT think “femoral compression”)
- Before removing the large-bore sheath, advance a 1:1 diameter occlusion balloon via the ipsilateral radial or femoral sheath and position it proximal to the arteriotomy.
- This “dry-closure” mindset matters because axillary compression is often ineffective and bleeding can escalate quickly.
Step 8: tighten ProStyle under balloon control (“dry closure”)
- Inflate the proximal occlusion balloon to arrest flow.
- Remove the large-bore sheath over the safety wire, then tighten the ProStyle knot under flow arrest.
- Briefly deflate to test haemostasis; re-inflate immediately if bleeding exceeds minimal oozing.
Step 9: add the plug component = angio-seal (ProStyle + angio-seal combo)
- If there is no or minimal oozing after ProStyle tightening, the result is good and we can only shape the vessel at the puncture site.
- Otherwise, during endo-clamping with a balloon upstream of the puncture, we can decide to deploy Angio-Seal (typically 8F) over the retained wire following standard steps (locator → anchor → collagen), as a bailout, deflating the balloon at the time of entry into the axillary access.
- Cut suture tails below skin level once haemostasis is confirmed.
Step 10: completion checks (mandatory in axillary access)
- Confirm patent haemostasis and vessel patency with angiography via the safety channel.
- Perform a focused distal perfusion check (pulse/pleth/hand perfusion; Doppler if available).
- Only then remove the rescue wire and complete skin closure and dressing.
Step 11: decision point = management of significant bleeding (axillary bailout logic)
- If bleeding is light, do not proceed with plug deployment: re-inflate the balloon and regain control.
- Consider adding an additional suture-based device (if your protocol allows) before attempting plug closure.
- If haemostasis remains inadequate, keep balloon control and prepare for covered stenting; surgical conversion is last resort (see example case)
Points of specific attention & take-home messages
- Proximal, extra-thoracic axillary “sweet spot” (1st rib–pectoralis minor), sometimes ultrasound-guided puncture, many times observe the wire inside the axillary artery.
- stay medial to delto-pectoral groove and remain mindful of brachial plexus/pneumothorax;
- Axillary ≠ femoral: compression often ineffective. Maintain ipsilateral radial or femoral safety access and rescue wire, use proximal balloon “dry-closure”, deploy add Angio-Seal only if oozing occurred but it is controlled;
- LIMA–LAD graft is not an absolute contraindication—CTA to confirm origin/patency and keep the in-sheath right before the origin of the graft; the size of the artery on CT is important and it is possible to perform an angiography from the in-sheat of the valve to the passage on the mammary artery to verify it is not occlusive.
A word from the reviewer

Non-femoral or alternative access routes for TAVI are needed in approximately less than 5% of all TAVI cases.
The transaxillary approach can be obtained percutaneously, but the management of access site complication can be challenging.
This article highlights and illustrates very nicely how to obtain a safety net during the procedure and how to apply bail out techniques when access site bleeding occurs.
Disclosures
- Morello Alberto: no disclosure
- Corcione Nicola: Abbott Medical spa, Biosensors, Meril
- Ferraro Paolo: no disclosure
- Cimmino Michele: no disclosure
- Albanese Michele: no disclosure
- Giordano Salvatore: no disclosure
- Giordano Arturo: Abbott Medical spa, Biosensors, Meril
Authors


No comments yet!